Intersite receipt
Use this transaction to perform the receipt of a sales delivery when it is an intersite purchase order.
You can access this transaction through:
-
The Receipt menu from the home page.
-
The View purchase order or the View purchase orders to receive inquiries.
Prerequisites
Functional prerequisites
Mobile Automation setup (FUNADCSEARCH)
Open: Setup > Stock > Mobile Automation setup
Use this function to automatically populate the Location field in Purchase receipt tickets. Go to the Receipt section and select the Location preloaded checkbox.
How to create an intersite receipt
Open: Receipt > Intersite receipt
To create an intersite receipt, you must enter information on 3 pages:
-
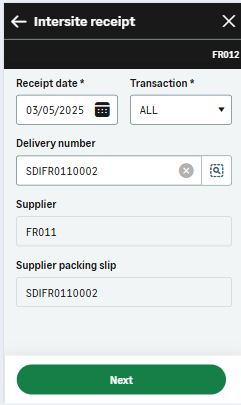
The initial page is dedicated to information related to the header: the Receipt date, the stock Site, the entry Transaction, the Delivery number.
-
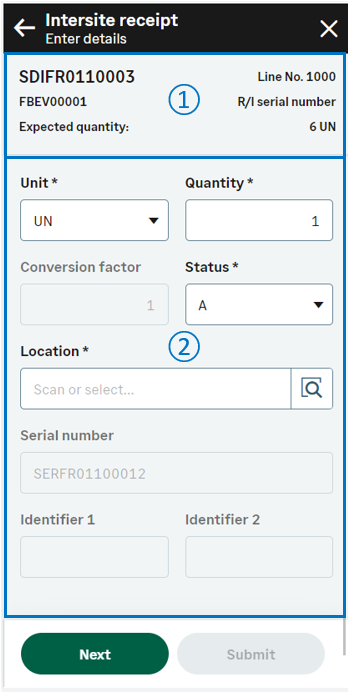
The second page is used to enter the receipt line details.
When you have processed a receipt line, you can submit it and move on to select another line. When the delivery line is allocated to several stock lines, you can select the next allocated stock lines for the current product before selecting another receipt line.
-
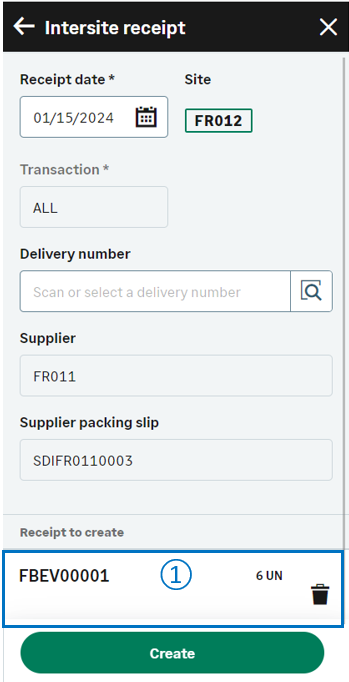
The third page is used to create the stock change document.
Operating mode
- In the initial page, check that the Receipt date, Site and Transaction default values are correct.
- Scan, select or enter the intersite Delivery number.
-
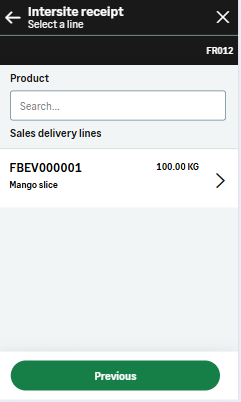
Tap Next to display the Select a line page with the list of products to be received.
-
Select a line. The Enter details page automatically displays.
-
Enter the stock characteristics such as the Unit, the received Quantity, the Status the Location and the LPN, depending on the way the product is managed in the receiving stock site.
-
Tap Next when the delivery line has many allocated stock lines.
-
The Enter details page for the next allocated stock line for the current product displays.
-
-
Tap Submit when you have processed all the stock lines for the product.
The Select a line page automatically displays again. -
When you have processed all the lines, you are automatically redirected to the initial page when you tap Submit. The delivery lines to be received are listed at the bottom of the screen. You are ready to complete one of the following actions:
-
Validate the creation of the stock change document: Tap Create.
-
Delete a line: Tap the delete icon.
-
Step by step
Intersite receipt initial page
 |
|
Select a line
 |
|
Enter line details
 |
|


Create the intersite receipt
 |
|
 |
|
| Field | Description | Sage X3 field code | Table (data creation) |
|---|---|---|---|
| Receipt date |
Receipt date |
RCPDAT | PRECEIPT |
| Site | Receipt site | PRHFCY | PRECEIPT |
| Purchase order | Purchase order | POHNUM | PRECEIPTD |
| Supplier | Supplier code | BPSNUM | PRECEIPT |
| Product | Product code | ITMREF | PRECEIPTD |
| Receipt unit | Receipt unit | UOM | PRECEIPTD |
| Quantity | Quantity | QTYUOM | PRECEIPTD |
| Status | Status | STA | STOJOU |
| License plate number | License plate number | LPNNUM | STOJOU |
| Location | Location | LOC | STOJOU |
| Supplier lot | Supplier lot number | BPSLOT | STOJOU |
| Lot | Lot number | LOT | STOJOU |
| Sub-lot | Sub-lot number | SLO | STOJOU |
| Lot custom text 1 | Lot custom text 1 | USRFLD1 | STOJOU |
| Lot custom text 2 | Lot custom text 2 | USRFLD2 | STOJOU |
| Lot custom number | Lot custom number | USRFLD3 | STOJOU |
| Lot custom date | Lot custom date | USRFLD4 | STOJOU |
| Expiration date | Expiration date | SHLDAT | STOJOU |
| Use-by date | Use-by date | DLUDAT | STOJOU |
| Potency | Potency | POT | STOJOU |
| Serial no. | Serial number | SERNUM | STOJOU |
| Major version | Major version | ECCVALMAJ | STOJOU |
| Minor version | Minor version | ECCVALMIN | STOJOU |
| Identifier 1 | Free field 1 | PALNUM | STOJOU |
| Identifier 2 | Free field 2 | CTRNUM | STOJOU |